I kept seeing this abstract wood signs show up everywhere when I was looking for inspiration for my old dining room. My thinking was to design my own. Here is a step-by-step on how I did that.
I wanted to recreate this piece of art that @steffianglewood made, but I wanted to make three of them.
Materials for Abstract Wood Signs
plywood – three 16X24 pieces 1X2 pieces of wood (lots) sandpaper wood glue brad nails and nailer saw
How I Built Abstract Wood Signs
Step 1
Cut three even pieces of plywood. I did 16X24.
* I sanded all of the wood I used. You should use 100 grit and then go up from there if you need to make it more smooth. Here is a blog on sandpaper grit if you want to learn more about it.
Step 2
Cut pieces of 1X2 that will frame the picture. Four pieces all the way around. Pictured it just the two sides, however you need all four. I saved these and put them on last.
Step 3
I glued a 1X2 that was 24 inches long 7 inches down from the top of the first sign. Make sure it is level.
Step 4
I then places five 1X2 at the top going vertical, see photo. I spaced this out with the 1 inch side of the 1X2. Remember, I used wood glue and brad nails for everything.
Step 5
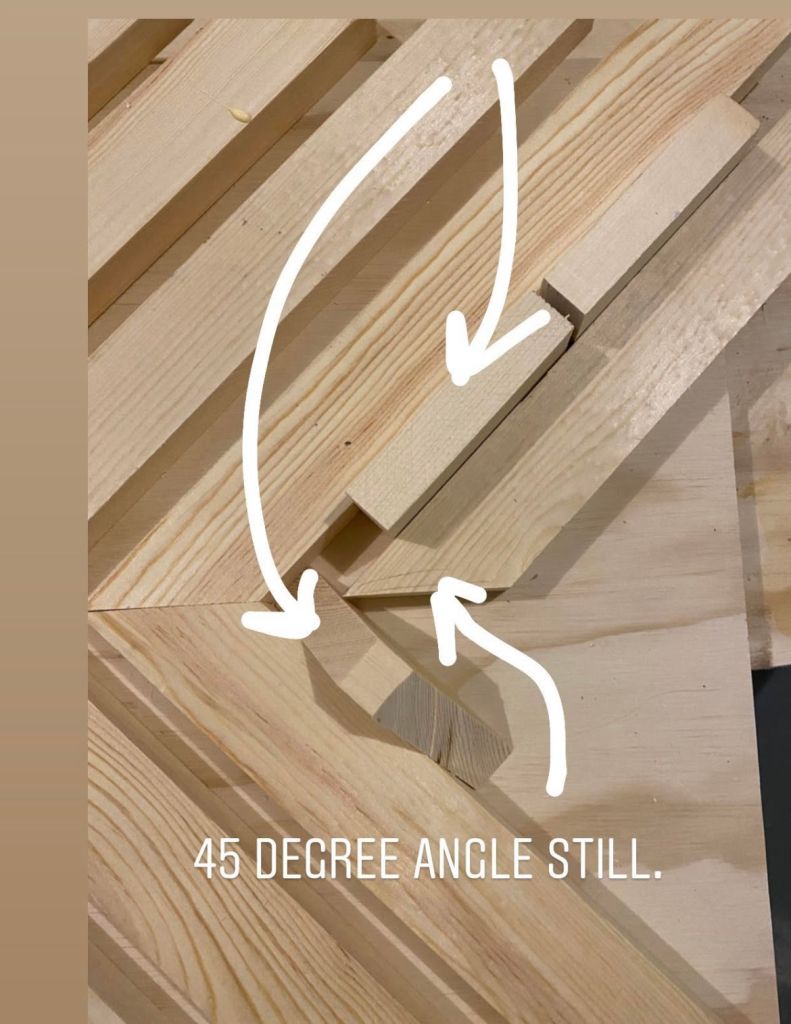
Pictures are so much easier than words to explain this, so I hope you look at the pictures. I cut two 1X2s and cut them at a 45 degree angle. Then, I then placed them where I wanted them and used wood glue and brad nails to hold them into place.
I have a little bit of overhang in the picture, I am going to just cut this off when I am done.
Step 6
I worked on all three at the same time so the pattern flowed throughout all three. Because of this, I used a 1X2 for the second sign 7 inches down from the top, along with a 1X2 one inch above it.
I also had the 45 degree angle boards continue onto the second sign.
Step 7
I added four and a half pieces of wood at the opposite 45 degree angle on the second sign. I wish I had a photo of me doing this, but I do not. You can see what I did in the final photo. I spaced all of my spaces with the 1 inch side of the 1X2. Also, I added a 1X2 to the bottom of the sign, hitting against the 45 degree angle boards, 1 inch from the bottom.
Step 8
For the third sign, I added an arrow looking pattern. To do this part, I spaced it with 1X2s and cut them at a 45 degree angle.
Step 9
I also continued the 1X2 horizontal piece (1 inch from the bottom) onto the third sign. Then, I added two vertical pieces of 1X2 as well. See the finished photo for this.
Step 10
I then added the sides of the sign. I put the vertical sides on first, then the horizontal ones. Again, remember I used wood glue and brad nails for this.
Step 11
They are really heavy, so I bought this 40 lbs wall hanging kit at walmart. They are $4.49 each.
Here is the Final Result
I loved how these turned out! It brings this whole space together. If you would like to know how I built the built-in bench, here is al link to that.